Coding an Amazon Alexa Skill in Java Using Dialog Directives

A couple of weeks ago, I decided to look into writing an Amazon Alexa Skill using the Java SDK. Alexa was an early entrant into the voice service market, allowing users to interact with the Amazon Marketplace with only their voice, as well as control smart devices to automate your home, play music, play games, etc. And other commercial vendors have created Alexa Skills to interact with their virtual/physical stores as well, making Alexa a new, massive marketplace.
Aside from learning something new, I thought it would be neat to create a Cork Hounds skill, allowing users to find the nearest dog friendly winery to a given City/State location. And I wanted to use the new Dialog Directives, which provide a mechanism to conduct a multi-part dialog with your users via Alexa. Prior to the advent of Dialog Directives, you needed to write the logic to get all the data you needed from the user, effectively mantaining the entire session yourself. Dialog Directives offer a cleaner way of managing the session, and can take several forms: (a) You can empower Alexa to get all the information my Skill needs for 'fulfillment', (b) You can retain control of the multi-part dialog, or (c) You can use a hybrid of the above.
Based on some quick research it seemed easy enough to do this with a Lambda function. However, as I started in on it, I discovered that the documentation and sample code have significant gaps in how to programmatically use Dialog Directives. After much trial/error, I finally got it working.
Overview
There are a couple interesting nuances with creating an Alexa Skill. I'm going to walk through it in the order that makes the most sense in retrospect. The ordering matters only slightly, and I'll highlight some key takeaways.
I've shared the Hello World Lambda package to a public github repository.
You'll want to download the Alexa Skill Java SDK to your local dev environment. Also, I'll be using Maven, which you can use or substitute with Gradle, etc. We'll start with modifying the HelloWorld to introduce a multi-part dialog using the Delegate Dialog Directive.
As a side note, do not confuse Alexa with AWS Lex. Lex is a tool for building voice and text chatbots. While Alexa and Lex share voice/text language translation features, Alexa is the manifestation that powers the Echo, Dot, Tap and Amazon Shopping Apps.
Initial Setup
Creating a Lambda Function
The initial steps to create an Alexa Function require information to be shared between the Developer portal and Lambda. We need to create the first version of our Lambda Function so that we have the ARN (Amazon Resource Name) for the function. Then we'll register as an Amazon Developer, where we'll create an Alexa Skill that references the ARN of our Lambda Function. Next we'll update our Lambda Function with the Skill ID from the Developer portal. Once we have all this in place, we can begin coding.
Let's get to it. I've created my own simple Maven project in eclipse. I'll assume your group id is "org.myorg" and your artifact id is "HelloWorld" for this example. From that process, I automatically have a src/main/java source folder in my new project. In that folder, I created two packages; one for my source, and another for the speech assets. For this example, I'll use generic package names: org.myorg.helloworld.source and org.myorg.helloworld.speechAssets.
I copied the following files to my speech assets package:
speechAssets/IntentSchema.json
speechAssets/SampleUtterances.txt
I copied the following files to my source package:
HelloWorldSpeechlet.java
HelloWorldSpeechletRequestStreamHandler.java
Eclipse should rename the 'package' inside these java files for you, but if you want to verify that the package names are correct.
Next, you'll want to update your Maven POM. My POM has the following dependencies:
    <dependencies>
        <dependency>
            <groupId>org.slf4j</groupId>
            <artifactId>log4j-over-slf4j</artifactId>
            <version>1.7.21</version>
        </dependency>
        <dependency>
            <groupId>com.amazon.alexa</groupId>
            <artifactId>alexa-skills-kit</artifactId>
            <version>1.3.1</version>
            <exclusions>
                <exclusion>
                    <groupId>log4j</groupId>
                    <artifactId>log4j</artifactId>
                </exclusion>
                <exclusion>
                    <groupId>org.slf4j</groupId>
                    <artifactId>slf4j-log4j12</artifactId>
                </exclusion>
            </exclusions>
        </dependency>
        <dependency>
            <groupId>com.amazonaws</groupId>
            <artifactId>aws-lambda-java-core</artifactId>
            <version>1.1.0</version>
        </dependency>
    	<dependency>
            <groupId>ch.qos.logback</groupId>
            <artifactId>logback-classic</artifactId>
            <version>1.1.7</version>
    	</dependency>
        <dependency>
            <groupId>ch.qos.logback</groupId>
            <artifactId>logback-core</artifactId>
            <version>1.1.7</version>
        </dependency>
    </dependencies>
Most notably, we've pulled in the Lambda Core and Alexa Skills Kit. Because the Alexa Skills Kit uses the (outdated) Log4J library, and I prefer using Logback, I exclude Log4J and slf4j-log4j12 dependencies, and import the log4j-over-slf4j dependency. This allows me to aggregate/control all log messages via my Logback config across this project for use with CloudWatch Logs. I'll provide my Logback xml below.
Also in my POM, I have a build specification to ensure all my dependencies are wrapped into a 'fat jar'. In order for Lambda to work, you need to have all your dependencies included in your Jar.
  <build>
    <sourceDirectory>src</sourceDirectory>
    <plugins>
      <plugin>
        <artifactId>maven-compiler-plugin</artifactId>
        <version>3.3</version>
        <configuration>
          <source>1.8</source>
          <target>1.8</target>
        </configuration>
      </plugin>
      <plugin>
        <groupId>org.apache.maven.plugins</groupId>
        <artifactId>maven-shade-plugin</artifactId>
        <version>2.3</version>
        <configuration>
          <createDependencyReducedPom>false</createDependencyReducedPom>
        </configuration>
        <executions>
          <execution>
            <phase>package</phase>
            <goals>
              <goal>shade</goal>
            </goals>
          </execution>
        </executions>
      </plugin>
    </plugins>
  </build>
For those of you looking to use Logback as I do, here is a simple configuration file that writes to STDOUT, which will get logged in CloudWatch Logs. You can just put this in your src/main/resources folder and Logback will pick it up.
<?xml version="1.0" encoding="UTF-8"?>
<configuration>

	<appender name="CONSOLE" class="ch.qos.logback.core.ConsoleAppender">
		<encoder>
			<pattern>%d{yyyy-MM-dd HH:mm:ss.SSS} %-5level (%F:%L\) [%logger{20}] : %msg%n</pattern>
		</encoder>
	</appender>

	<logger name="org.myorg" level="DEBUG"/>

	<root level="INFO">
		<appender-ref ref="CONSOLE" />
	</root>
</configuration>
Next we'll package up our code by running the mvn clean package command. Once this finishes building, you should have a 'HelloWorld-0.0.1-SNAPSHOT.jar' (or similarly named) package in your target folder.
Creating a Lambda Function
Using the Amazon Web Services Console, you'll want to create a Lambda Function in the US-EAST-1 Region. According to the Alexa Skills Documentation, you must create your Lambda Function in either the US-EAST-1 or EU (Ireland) Region. To create the Function, you'll need to supply some information:
- A name -e.g. 'HelloWorld',
- Select Java 8 as the 'Runtime',
- Select our 'HelloWorld-0.0.1-SNAPSHOT.jar' (or similarly named) package as the 'Function package',
- Provide the Handler (entry point) to your code. In our example, this would be 'org.myorg.helloworld.source.HelloWorldSpeechletRequestStreamHandler'.
- Set the Trigger for this function to 'Alexa Skills Kit'.
The other standard settings should be sufficient ... although if you are building your own function that touches other AWS Services you may need to setup/choose a Role assignment. Save and Create your Function. Don't bother testing the code at this point.
At the top of the page of our newly created Lambda Function, you'll see the ARN. It should look something like this: ARN - arn:aws:lambda:us-east-1:xxxxxxxxxxxx:function:HelloWorld where the x's are your AWS account ID. This is the ARN that we'll use when setting up our Alexa Skill in the Developer Portal.
Developer Portal
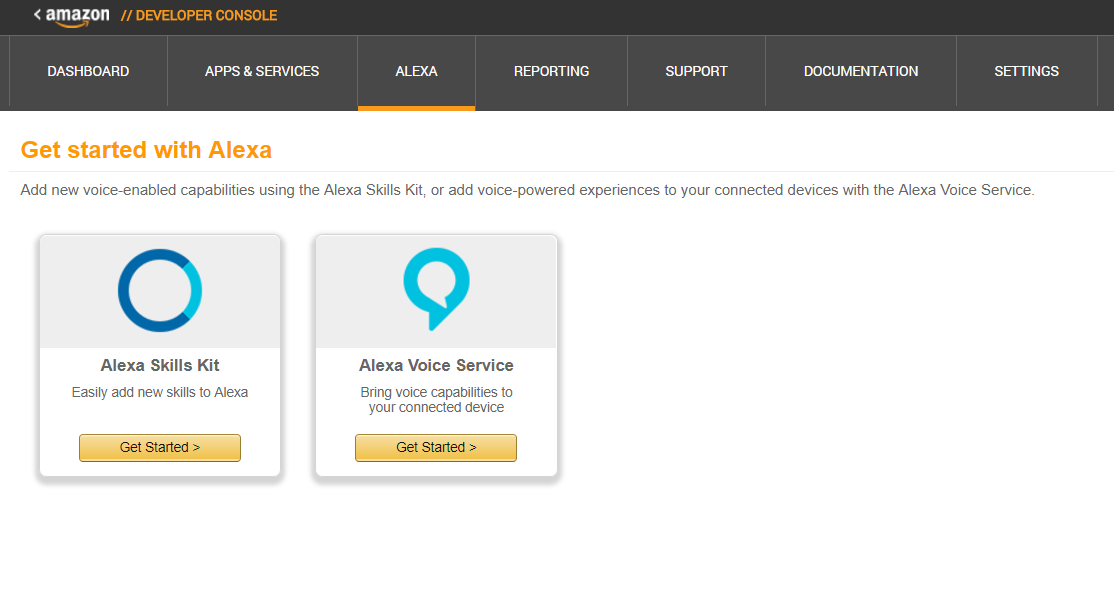
To start, you'll want to register as an Amazon Developer, via their portal. If you already have an Amazon/AWS account, you'll simply Sign-In and complete the registration to become an Amazon Developer. Once you've registered, go to Alexa on the top menu. You'll notice the linked text Amazon provides for accessing the documentation for building a custom skill. Choose the 'Alexa Skills Kit' by clicking 'Get Started >'.
Now, we'll Create/Add a New Skill. On the setup screen, you'll see that there are steps on the left nav for:
- Skill Information
- Interaction Model
- Configuration
- SSL Certificate
- Test
- Publishing Information
- Privacy & Compliance
On the Skill Information tab, for this tutorial, we're building a 'Custom Interaction Model'. You'll provide a Skill Name, and the Invocation Name. The Skill Name is the name that appears when users review available skills to enable/disable. The Invocation Name is the name users provide when invoking your skill via Alexa -e.g. in our case, "Alexa ask 'Cork Hounds'...". For this HelloWorld test, you can simply set the Skill Name to 'Say Hello' and the Invocation Name to your own name -e.g. 'Jane Doe'. To save this Skill, we'll choose NO for Audio Player, Video App and Render Template.
After Saving and clicking Next, we will use the Skill Builder to further define our skill, and document the information you need to execute the method you are building in Lambda.
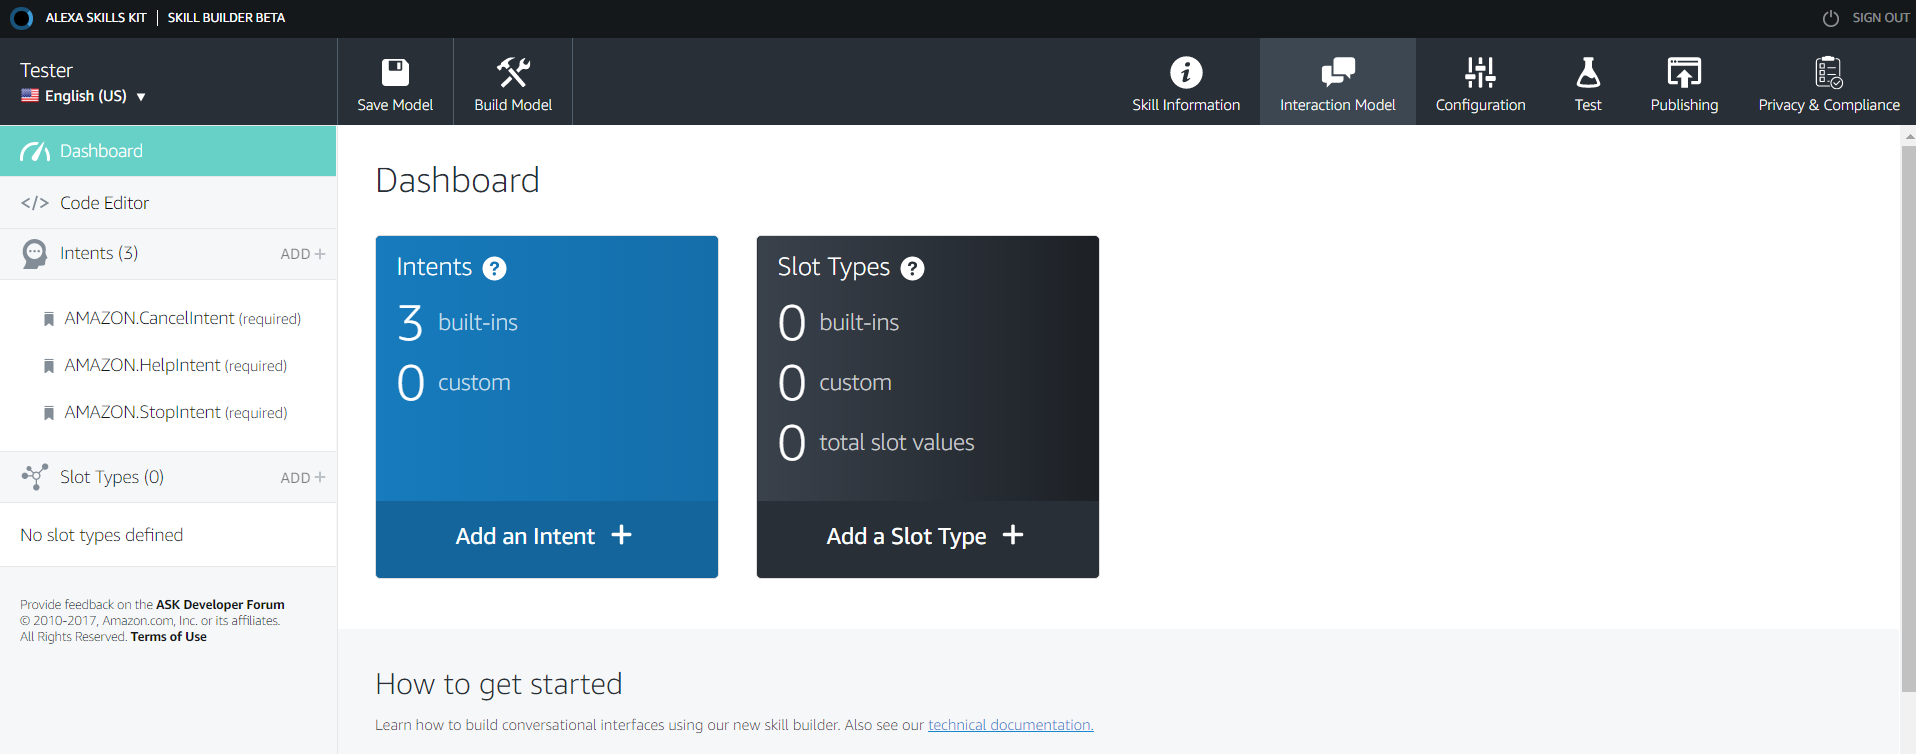
For this example with HelloWorld, we'll modify it to take another person's name in order to make it say, "Hello, {name}" using a Dialog Directive. So, let's start by adding an Intent, from the left nav menu. Sticking with our theme, we'll give this intent the name, "HelloWorld". Notice though that there are 154 predefined intents (at the time of this post) that you could choose from when building your own Skill.
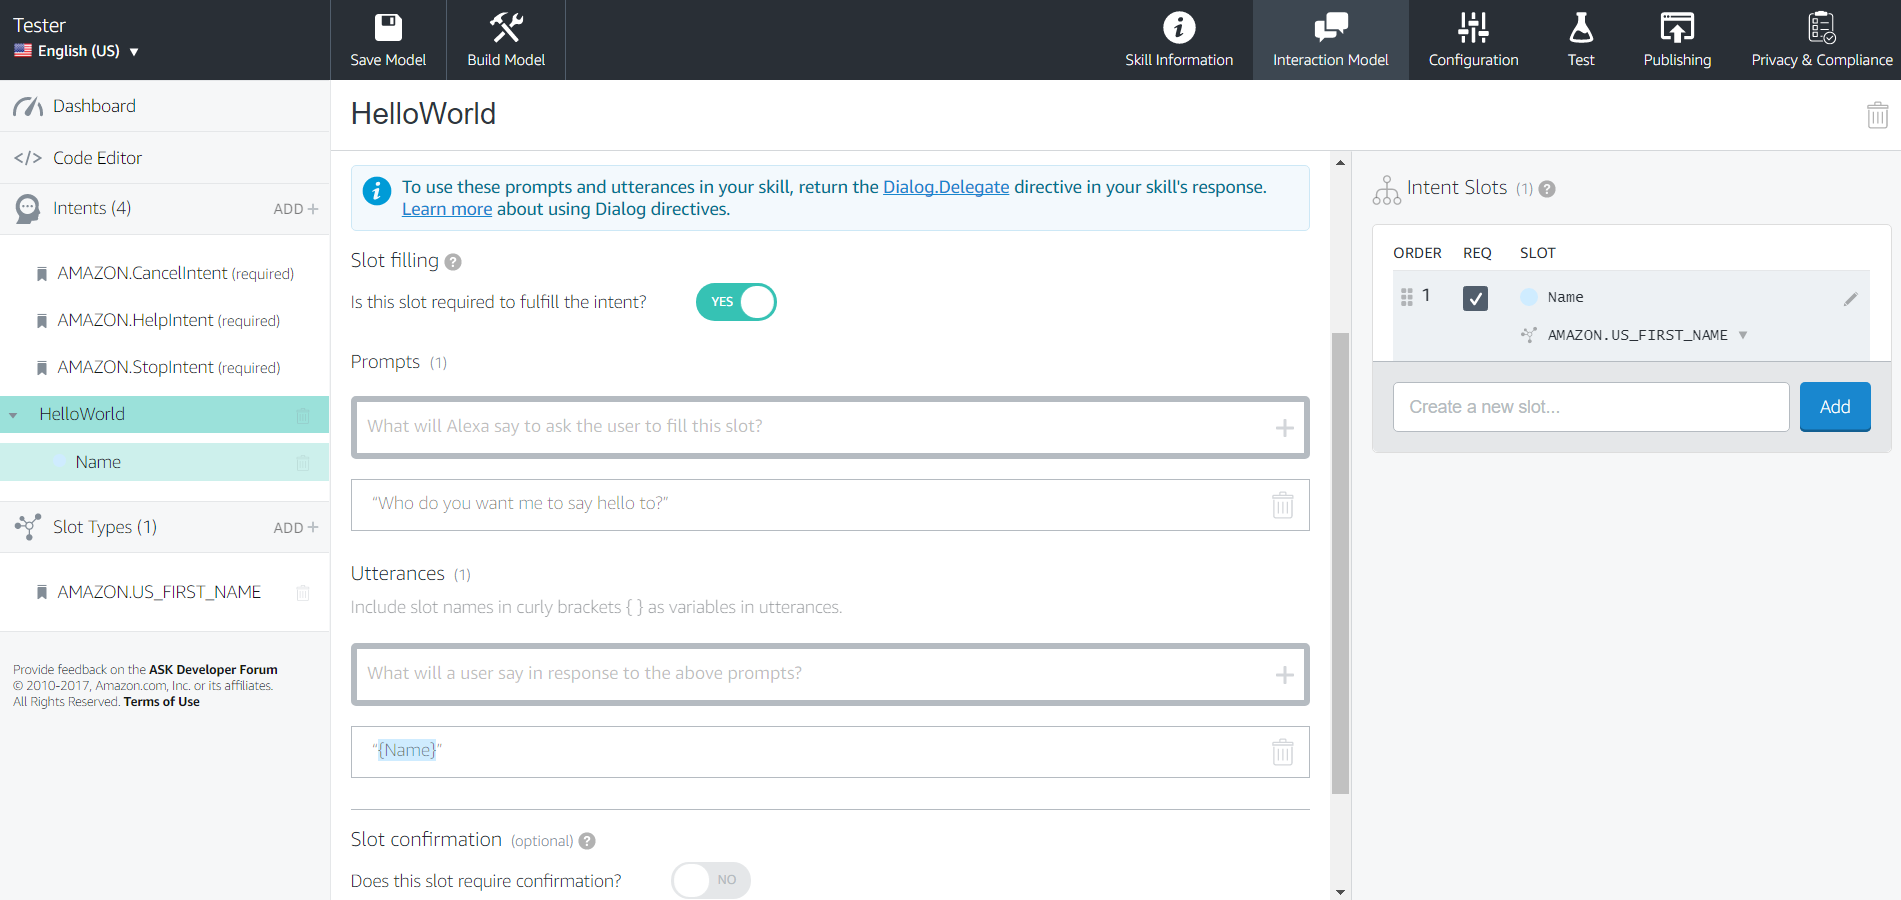
After clicking 'Create Intent', we now must enter Sample Utterances that Alexa will use to invoke this Intent. I've entered, "Say Hello" as my only intent, and hit enter. Now, on the right menu entitled, "Intent Slots", I'm adding a required slot called Name, and setting it to map to a predefined Data Type called AMAZON.US_FIRST_NAME. You can build on this example later by adding other slots, changing their required order, using custom data types or other Amazon data types.
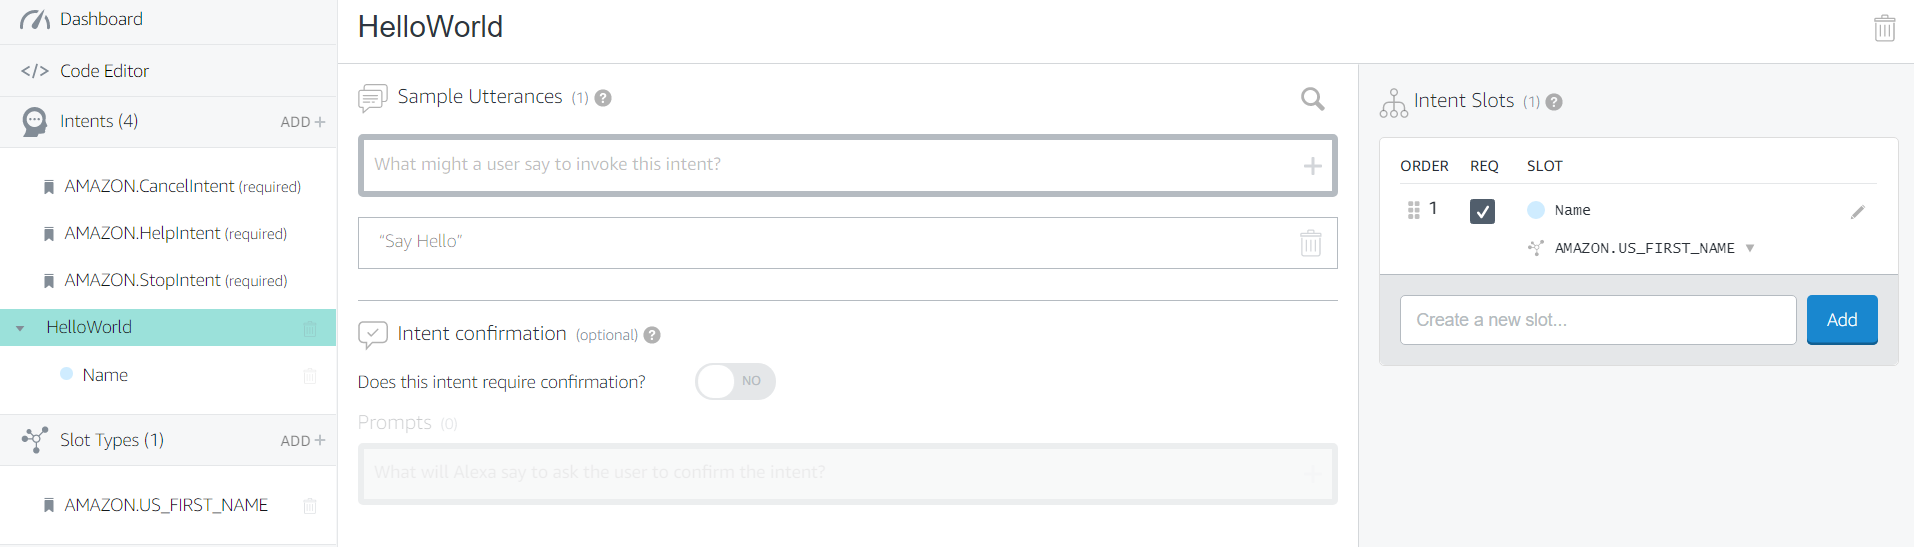
Next, we'll need to provide the prompt for Alexa to ask the user for the Name slot. So, on the left nav, click on the arrow to expand the HelloWorld intent as shown in the screen capture below, to expose the 'Name' slot. Click on the 'Name' slot under HelloWorld on the left nav. You can see I have provided a prompt of 'Who do you want me to say hello to?', and an Utterance of simply {Name}. Be sure to click the plus at the end of the input field or press enter to add these Prompts/Utterances. It's easy to type in the text, and forget to actually add them to the Dialog.
Now, on the top menu of the Skill Builder, click 'Save Model', and then 'Build Model'. Once it finishes building, click on 'Configuration' on the top right. Here, we'll connect our Lambda function to the skill. Choose AWS Lambda ARN, and your Geographical Region. At the time of this post, choosing North America means your Lambda function resides in US-EAST-1, while Europe points to EU-IRELAND-1. If you choose North America, as I've done, you'll then put your ARN into the North America input field.
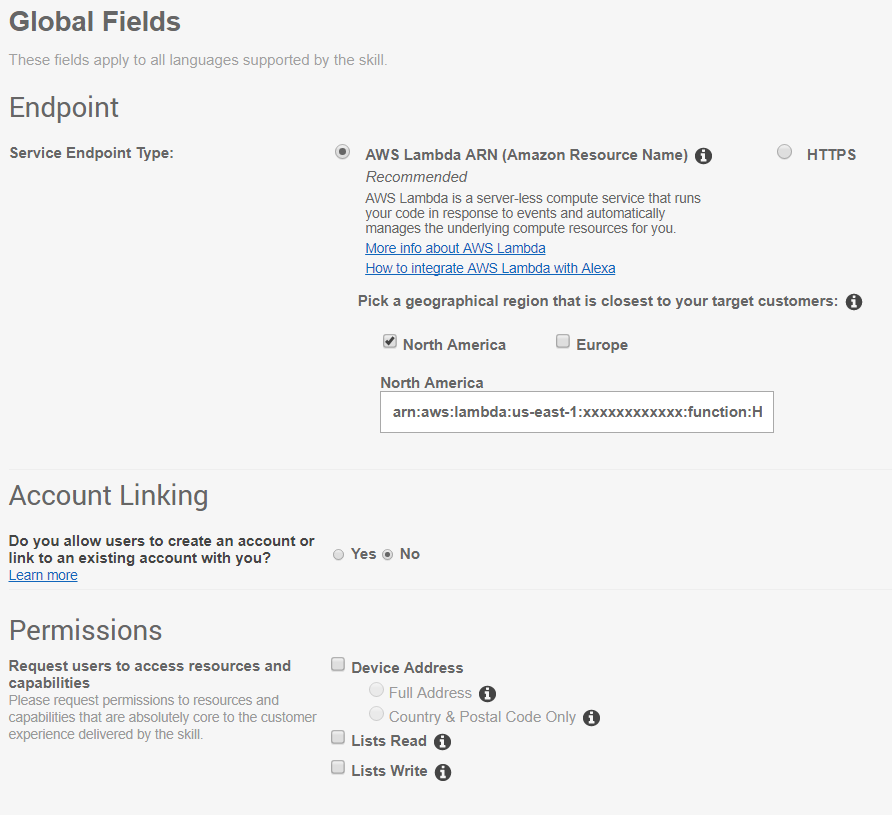
Be sure to Save this information. Now, at the top left, you'll notice an ID string similar to amzn1.ask.skill.xxxxxxxx-xxxx-xxxx-xxxx-xxxxxxxxxxxx. You'll want to copy that, as we'll be using it to update our lambda function shortly.
Writing an Alexa Skill
Dialog Directives
Amazon provides an entire page on Dialog Directives, but it does not really tell you how to use them programmatically.
Delegating the Dialog
Now, I'll show you how to Delegate the dialog so that Alexa gets the Name of the individual we will say hello to, using the Prompts we defined in the Skill Builder.
First, we need to update our Lambda Function with the Alexa Skill ID we copied from the Developer Portal. So, open the HelloWorldSpeechletRequestStreamHandler. Replace the entire string that reads "amzn1.echo-sdk-ams.app.[unique-value-here]" with the skill ID you got from the Portal and save the file.
public final class HelloWorldSpeechletRequestStreamHandler extends SpeechletRequestStreamHandler {
    private static final Set<String> supportedApplicationIds = new HashSet<String>();
    static {
        /*
         * This Id can be found on https://developer.amazon.com/edw/home.html#/ "Edit" the relevant
         * Alexa Skill and put the relevant Application Ids in this Set.
         */
        supportedApplicationIds.add("amzn1.ask.skill.xxxxxxxx-xxxx-xxxx-xxxx-xxxxxxxxxxxx");
    }

    public HelloWorldSpeechletRequestStreamHandler() {
        super(new HelloWorldSpeechlet(), supportedApplicationIds);
    }
}
Next, we'll need to update the HellowWorldSpeechlet to leverage the Delegate Dialog Directive, and then use the subsequent Name Slot in our response. In HellowWorldSpeechlet, we will first add some new Imports as show below.
import java.util.ArrayList;
import java.util.HashMap;
import java.util.Iterator;
import java.util.List;
import java.util.Map;

import com.amazon.speech.speechlet.dialog.directives.DelegateDirective;
import com.amazon.speech.speechlet.dialog.directives.DialogIntent;
import com.amazon.speech.speechlet.dialog.directives.DialogSlot;
import com.amazon.speech.speechlet.IntentRequest.DialogState;
import com.amazon.speech.slu.Slot;
import com.amazon.speech.speechlet.Directive;
Next, we will alter the onIntent and getHelloResponse methods, in that order. These methods, in this example, will control the response to our invocation of, "Alexa ask John Doe to Say Hello" ... substituting 'John Doe' for whatever name you set as the Invocation Name.
I will step through some code snippets below, but you can scroll down to the end of this section for the completed method to see how all this fits together.
First, before we begin processing the intent, we want to get the DialogState from the request. Alexa passes one of several states to include 'STARTED', 'IN PROGRESS', and 'COMPLETED'. We'll need to use those to tell provide responses that drive Alexa's engagement with the user.
    //Get Dialog State
    DialogState dialogueState = request.getDialogState();
Also, as we process the Intent, we need to update the IF statement to reflect our new Intent name of 'HelloWorld', rather than 'HelloWorldIntent'.
if ("HelloWorld".equals(intentName)) {
Amazon's Dialog documentation says that when your function receives an IntentRequest with a dialog state of 'STARTED', you must return an updated Intent object to tell Alexa which slots she needs to prompt the user for. This gives you control over the engagement, even though we are delegating the execution of it to Alexa.
Another nuance is that the documentation says you can just return the Intent that you receive as the updatedIntent, but that doesn't appear to be the case because the Directive requires a DialogIntent. So this information must be mapped over. To solve for this, I'll just set the name, and then iterate over the slots to create a DialogIntent from the Intent object our Lambda function receives.
    DialogIntent dialogIntent = new DialogIntent();
    dialogIntent.setName(intentName);
    Map<String,DialogSlot> dialogSlots = new HashMap<String,DialogSlot>();

    Iterator iter = intent.getSlots().entrySet().iterator();
    log.debug("Building DialogIntent");
    while (iter.hasNext()) {
        Map.Entry pair = (Map.Entry)iter.next();
        DialogSlot dialogSlot = new DialogSlot();
        Slot slot = (Slot) pair.getValue();
        dialogSlot.setName(slot.getName());
        dialogSlots.put((String) pair.getKey(), dialogSlot);
        log.debug("DialogSlot " + (String) pair.getKey() + " with Name " + slot.getName() + " added.");
    }

    dialogIntent.setSlots(dialogSlots);
Once we create our DialogIntent and add the slots to it that we want Alexa to fill, we will create a DelegateDirective and add the DialogIntent. The Amazon documentation makes reference to a Dialog.Delegate. The DelegateDirective, which extends Directive class, has as its json name Dialog.Delegate. So, when this directive gets translated to a JSON payload in the rest response, it becomes Dialog.Delegate.
    DelegateDirective dd = new DelegateDirective();
    dd.setUpdatedIntent(dialogIntent);
You will add this DelegateDirective to the SpeechletResponse via the seDirectives method. One key takeaway I discovered is that you must set the setShouldEndSession() method on the SpeechletResponse to false. This boolean defaults to true, which will end your dialog prematurely. For Alexa to use the DelegateDirective, we do not add any Reprompts or Cards. We return the SpeechletResponse with just the directive and the session state in response to the 'STARTED' dialog state.
    List<Directive> directiveList = new ArrayList<Directive>();
    directiveList.add(dd);

    SpeechletResponse speechletResp = new SpeechletResponse();
    speechletResp.setDirectives(directiveList);
    speechletResp.setShouldEndSession(false);
    return speechletResp;
If the state is 'COMPLETED', then we'll simply call our getHelloResponse, but with modifications. We need to modify getHelloResponse to use the completed Intent. We'll discuss these modifications indepth after we are finished modifying the onIntent method.
return getHelloResponse(intent);
In our example, we should not receive a 'IN PROGRESS' state because we are only getting one slot. So the state should go from 'STARTED' to 'COMPLETED'; however, we will add a catch-all ELSE statement to handle states other than STARTED and COMPLETED to be thorough. If there were any IN PROGRESS states from collecting more slots, we simply need to return an empty DelegateDirective() in the SpeechletResponse, and set setShouldEndSession() to false to keep the dialog going.
    DelegateDirective dd = new DelegateDirective();
    List<Directive> directiveList = new ArrayList<Directive>();
    directiveList.add(dd);

    SpeechletResponse speechletResp = new SpeechletResponse();
    speechletResp.setDirectives(directiveList);
    speechletResp.setShouldEndSession(false);
    return speechletResp;
Here is the complete method.
    @Override
    public SpeechletResponse onIntent(final IntentRequest request, final Session session)
            throws SpeechletException {
        log.info("onIntent requestId={}, sessionId={}", request.getRequestId(),
                session.getSessionId());

        Intent intent = request.getIntent();
        String intentName = (intent != null) ? intent.getName() : null;

        //Get Dialog State
        DialogState dialogueState = request.getDialogState();

        if ("HelloWorld".equals(intentName)) {

            //If the IntentRequest dialog state is STARTED
            if (dialogueState.equals(DialogState.STARTED)) {

                DialogIntent dialogIntent = new DialogIntent();
                dialogIntent.setName(intentName);
                Map<String,DialogSlot> dialogSlots = new HashMap<String,DialogSlot>();

                Iterator iter = intent.getSlots().entrySet().iterator();
                log.debug("Building DialogIntent");
                while (iter.hasNext()) {
                    Map.Entry pair = (Map.Entry)iter.next();
                    DialogSlot dialogSlot = new DialogSlot();
                    Slot slot = (Slot) pair.getValue();
                    dialogSlot.setName(slot.getName());
                    dialogSlots.put((String) pair.getKey(), dialogSlot);
                    log.debug("DialogSlot " + (String) pair.getKey() + " with Name " + slot.getName() + " added.");
                }

                dialogIntent.setSlots(dialogSlots);

                DelegateDirective dd = new DelegateDirective();
                dd.setUpdatedIntent(dialogIntent);

                List<Directive> directiveList = new ArrayList<Directive>();
                directiveList.add(dd);

                SpeechletResponse speechletResp = new SpeechletResponse();
                speechletResp.setDirectives(directiveList);
                speechletResp.setShouldEndSession(false);
                return speechletResp;

             } else if (dialogueState.equals(DialogState.COMPLETED)) {

                log.debug("onIntent, inside dialogueState IF statement");
                return getHelloResponse(intent);

             } else {

                log.debug("onIntent, inside dialogueState ELSE statement");
                DelegateDirective dd = new DelegateDirective();

                List<Directive> directiveList = new ArrayList<Directive>();
                directiveList.add(dd);

                SpeechletResponse speechletResp = new SpeechletResponse();
                speechletResp.setDirectives(directiveList);
                speechletResp.setShouldEndSession(false);
                return speechletResp;
             }
        } else if ("AMAZON.HelpIntent".equals(intentName)) {
            return getHelpResponse();
        } else {
            throw new SpeechletException("Invalid Intent");
        }
    }
Now, we'll want getHelloResponse to take an Intent so that we can get the completed 'Name' slot for use in our response. Then we'll use the intent.getSlot() method to retrieve the name, and add that to our speechText. Here is the completed getHelloResponse method.
    private SpeechletResponse getHelloResponse(Intent intent) {

        String name = intent.getSlot("Name").getValue();
        String speechText = "Hello, " + name;

        // Create the Simple card content.
        SimpleCard card = new SimpleCard();
        card.setTitle("HelloWorld");
        card.setContent(speechText);

        // Create the plain text output.
        PlainTextOutputSpeech speech = new PlainTextOutputSpeech();
        speech.setText(speechText);

        return SpeechletResponse.newTellResponse(speech, card);
    }
Now, you'll want to mvn clean package the HelloWorld code again, and upload it to your Lambda function, which you can do via Eclipse, the AWS Console, etc.
Controlling the Dialog and Hybrid Approaches
Using the information above, you should be able to extend the documentation that Amazon provides on Dialog Directives to perform more complex interactions.
Testing and Debugging the Alexa Skill
There are a couple things I learned in testing my Skill. First, at the time of this blog post, the Service Simulator in the Developer Portal on the Test page of your Skill does not support Dialog Directives. However, it is useful for generating partially qualified JSON (which we'll modify slightly) to test responses from our Skill manually in both the Service Simulator, and Lambda Test pages.
Therefore, go to the Service Simulator. With the 'Text' tab selected, enter the Utterance that we created in the Skill Builder, "Say Hello". It will produce a json 'IntentRequest' similar to the below. However, it does not include the dialogState, which causes Lambda to respond with an error. Copy this json text to an editor, and let's add "dialogState": "STARTED", between locale and timestamp, as shown below:
{
  "session": {
    "sessionId": "SessionId.xxxxxxxx-xxxx-xxxx-xxxx-xxxxxxxxxxxx",
    "application": {
      "applicationId": "amzn1.ask.skill.xxxxxxxx-xxxx-xxxx-xxxx-xxxxxxxxxxxx"
    },
    "attributes": {},
    "user": {
      "userId": "amzn1.ask.account.xxxxxxxxxxxxxxxxxxxxxxxxxxxxxxxxxxxxxxxxxxxxxxxxxxxxxxxxxxxxxxxxxxxxxxxxxxxxxxxxxxxxxxxxxxxxxxxxxxxxxxxxxxxxxxxxxxxxxxxxxxxxxxxxxxxxxxxxxxxxxxxxxxxxxxxxxxxxxxxxxxxxxxxxxxxxxxxxxxxxxxxxxxxxxxxxxxxxxxxxxxx"
    },
    "new": true
  },
  "request": {
    "type": "IntentRequest",
    "requestId": "EdwRequestId.xxxxxxxx-xxxx-xxxx-xxxx-xxxxxxxxxxxx",
    "locale": "en-US",
    "dialogState": "STARTED",
    "timestamp": "2017-07-01T22:59:39Z",
    "intent": {
      "name": "HelloWorld",
      "slots": {
        "Name": {
          "name": "Name"
        }
      }
    }
  },
  "version": "1.0"
}
Now we can use this with the Service Simulator by going to the 'JSON' tab, paste in the IntentRequest with the STARTED dialogState, and click 'Ask HelloWorld'. We should get a response similar to this:
{
  "version": "1.0",
  "response": {
    "outputSpeech": null,
    "card": null,
    "reprompt": null,
    "speechletResponse": {
      "outputSpeech": null,
      "card": null,
      "directives": [
        {
          "updatedIntent": {
            "name": "HelloWorld",
            "confirmationStatus": null,
            "slots": {
              "Name": {
                "name": "Name",
                "value": null,
                "confirmationStatus": null
              }
            }
          }
        },
        {
          "template": {
            "token": null,
            "backButtonBehavior": "VISIBLE",
            "backgroundImage": null,
            "title": {
              "text": "<big>HelloWorld</big>"
            },
            "hintText": null
          }
        }
      ],
      "reprompt": null,
      "shouldEndSession": false
    }
  },
  "sessionAttributes": {}
}
Notice that the directive includes an updated intent. And although it does not explicitly say it is a Dialog.Delegate directive, it is. As well, notice that the shouldEndSession is set to false as it should be.
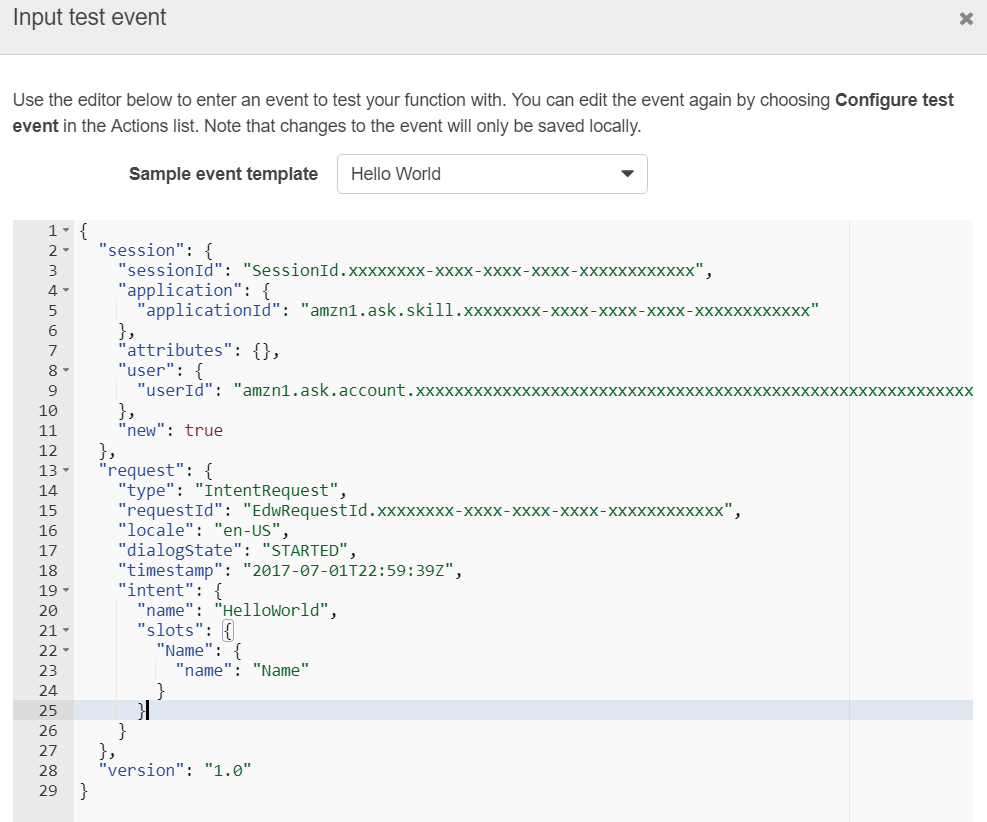
We can also use the first IntentRequest, where we added the dialogState, in Lambda for testing. Simply create a test event, and paste in your updated IntentRequest with dialogState set to STARTED.
Doing so should produce a response back similar to this:
{
  "version": "1.0",
  "response": {
    "directives": [
      {
        "type": "Dialog.Delegate",
        "updatedIntent": {
          "name": "HelloWorld",
          "slots": {
            "Name": {
              "name": "Name"
            }
          }
        }
      }
    ],
    "shouldEndSession": false
  },
  "sessionAttributes": {}
}
In the Lambda response, we more plainly see that the response is a Dialog.Delegate, with the updated intent.
Now, lets alter our IntentRequest by changing our dialogState to COMPLETED, and provide a value for the Name slot, such as George. I've provided an example below ... but you'll want to do this in your IntentRequest so that it has all your IDs set.
{
  "session": {
    "sessionId": "SessionId.xxxxxxxx-xxxx-xxxx-xxxx-xxxxxxxxxxxx",
    "application": {
      "applicationId": "amzn1.ask.skill.xxxxxxxx-xxxx-xxxx-xxxx-xxxxxxxxxxxx"
    },
    "attributes": {},
    "user": {
      "userId": "amzn1.ask.account.xxxxxxxxxxxxxxxxxxxxxxxxxxxxxxxxxxxxxxxxxxxxxxxxxxxxxxxxxxxxxxxxxxxxxxxxxxxxxxxxxxxxxxxxxxxxxxxxxxxxxxxxxxxxxxxxxxxxxxxxxxxxxxxxxxxxxxxxxxxxxxxxxxxxxxxxxxxxxxxxxxxxxxxxxxxxxxxxxxxxxxxxxxxxxxxxxxxxxxxxxxx"
    },
    "new": true
  },
  "request": {
    "type": "IntentRequest",
    "requestId": "EdwRequestId.xxxxxxxx-xxxx-xxxx-xxxx-xxxxxxxxxxxx",
    "locale": "en-US",
    "dialogState": "COMPLETED",
    "timestamp": "2017-06-29T01:19:19Z",
    "intent": {
      "name": "HelloWorld",
      "slots": {
        "Name": {
          "name": "Name",
          "value": "George",
          "confirmationStatus": "NONE"
        }
      }
    }
  },
  "version": "1.0"
}
Let's submit this via the 'JSON' tab in Service Simulator, and we should get a response similar to the below:
{
  "version": "1.0",
  "response": {
    "outputSpeech": {
      "type": "PlainText",
      "text": "Hello, George"
    },
    "card": {
      "content": "Hello, George",
      "title": "HelloWorld",
      "type": "Simple"
    },
    "reprompt": null,
    "speechletResponse": {
      "outputSpeech": {
        "id": null,
        "text": "Hello, George"
      },
      "card": {
        "title": "HelloWorld",
        "content": "Hello, George"
      },
      "directives": null,
      "reprompt": null,
      "shouldEndSession": true
    }
  },
  "sessionAttributes": {}
}
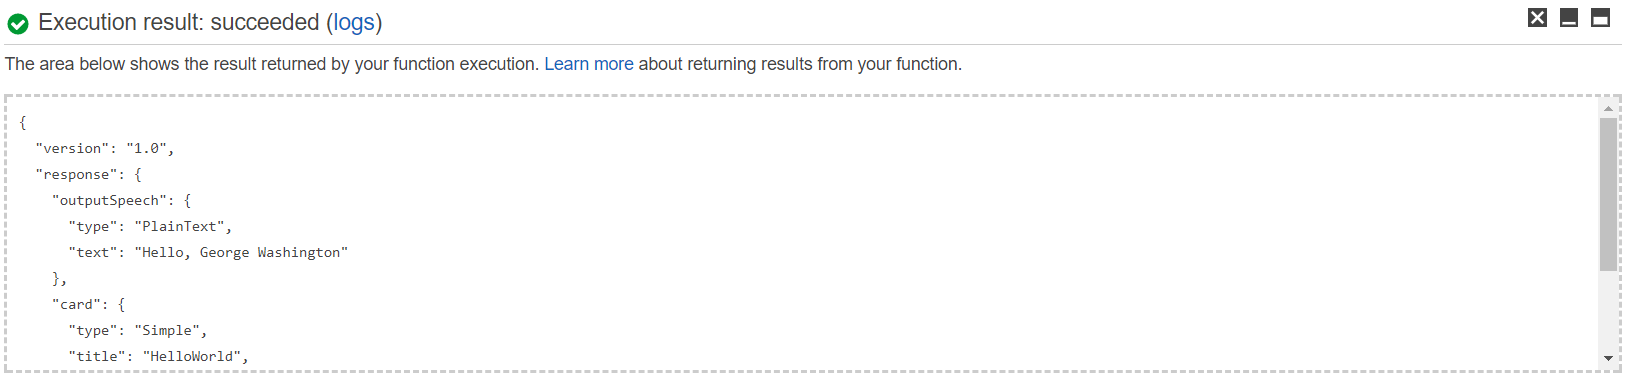
Notice that the card returns with 'Hello, George'. As well, see that when we set the state to COMPLETED, the shouldEndSession is set to true. And submitting the same IntentRequest via Lambda's test event will produce the following response.
{
  "version": "1.0",
  "response": {
    "outputSpeech": {
      "type": "PlainText",
      "text": "Hello, George"
    },
    "card": {
      "type": "Simple",
      "title": "HelloWorld",
      "content": "Hello, George"
    },
    "shouldEndSession": true
  }
}
Lambda will provide more information to debug any errors, and you can quickly get to CloudWatch Logs to see the output by clicking on the logs link from Lambda (screenshot below). You can beef up your Lambda function with lots of log statements and see a detailed breakdown of where things when wrong from within CloudWatch.
Now that we've tested our function from Service Simulator and Lambda, and we are reasonably confident that it works, we can use the Amazon Alexa and Amazon Marketplace apps to test it with Alexa. And it may be possible to use an Echo/Dot/Tap as well, but I do not have one handy to try it. From within the Developer Console, on the Test page of your Skill, you should see that testing from Alexa is enabled.
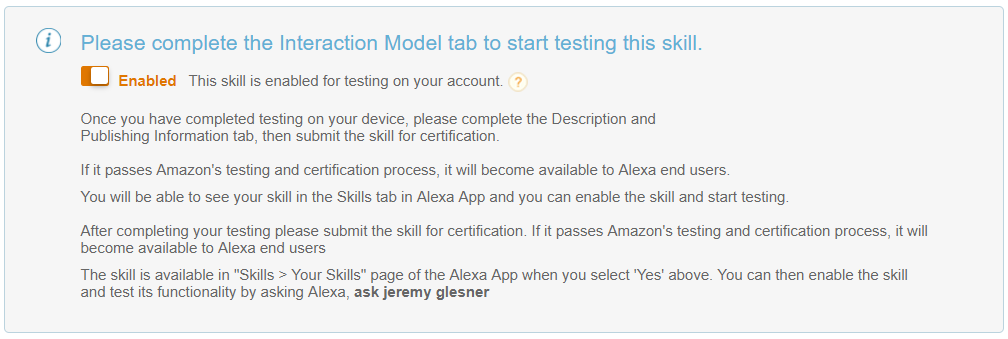
This means that this Skill has been auto-enabled on your Amazon account. You should be able to simply open up the Amazon Marketplace app on your handheld device and click the microphone. (This is located near the top right in iOS ... may be positioned different on an Android, etc).
Using the Amazon Marketplace app, clicking on the microphone, you can simply say, Alexa ask John Doe to Say Hello, substituting John Doe with your invocation name. Alexa should respond with 'Who do you want me to say hello to?'. If you then say, 'George', she should respond with 'Hello, George'.
Status Update: Publication
Our Amazon Skill was accepted! Testing is the key. Your skill must handle Cancel, Help and Stop Intents in addition to your custom Intents. These come standard in the Skill Builder, but you must add utterances to initiate them. The HelloWorld example handles a HelpIntent, but needs to be updated to handle the StopIntent and CancelIntent. In addition to those Intents, you must also handle all possible error conditions for your skill, providing responses that help users. Here is an updated conditional for the onIntent method:
    if ("HelloWorld".equals(intentName)) {

        //handle all error conditions -e.g. correct data, incorrect data

    } else if ("AMAZON.HelpIntent".equals(intentName)) {

        // Should return an ask response -e.g. .newAskResponse(speech, reprompt, card);
        log.debug("Method: onIntent, inside HelpIntent statement");
        return getHelpIntentResponse();

    } else if ("AMAZON.CancelIntent".equals(intentName)) {

        // Should return a tell response -e.g. .newTellResponse(speech, card);
        log.debug("Method: onIntent, inside CancelIntent statement");
        return getExitIntentResponse();

    } else if ("AMAZON.StopIntent".equals(intentName)) {

        // Should return a tell response -e.g. .newTellResponse(speech, card);
        log.debug("Method: onIntent, inside StopIntent statement");
        return getStopIntentResponse();

    } else {

        LOG.debug("Method: onIntent, throwing SpeechletException");
        throw new SpeechletException("Invalid Intent");
    }
One you handle all conditions, be creative using the testing tips we provided above to interact with the skill, providing both good and bad responses to your skill. Trigger the help, cancel and stop intents. If everything works through, and you don't receive any Alexa error responses, you should be in good shape.
It's always good to read all the available documentation, too. There are a number of resources for publishing a skill. First, here is Amazon's documentation for certifying your skill. There is also a helpful Alexa Blog that contains tips for successful certification.
In addition to using the Amazon Marketplace app to test your skill, which I reference in the testing section, you can also use the Echo Simulator. And now, you can also submit your skill for beta testing.
There are frequent promotions for building Alexa Skills. In July 2017, the first 5,000 developers will receive a free Dot and a pair of Alexa Developer socks!
Lastly, you can register to receive credits to run your skill that cover some/all the expenses. This way, you get some compensation for the expense of contributing the skill.