Processing Multipart/Form-Data Using API Gateway and a Java Lambda Proxy for Storage in S3


I am working on a new project for Cork Hounds, and spent some time recently figuring out how to upload files to Amazon Web Services (AWS) Simple Storage Service (S3) using API Gateway as a Lambda Proxy to a Lambda function written in Java. API Gateway can act as a passthrough, sending all data directly to a Lambda function. This makes it possible to send multipart/form-data to a lambda for processing. And while it is possible to upload files to S3 using other techniques (-e.g. a pre-signed URL) that I discovered during my research, I'm using a plugin that prefers to upload files directly once selected. Trying to use a pre-signed URL here introduces more complexity. In addition, I wanted to broker the upload using server side business logic, and keep my bucket(s) private. There aren't that many clear/concise resources that describe how to configure API Gateway for passing multipart/form-data, and even fewer that describe out how to use Java to process multipart/form-data in lambda. So, here we go!
Limitations
There are a couple limitations to this approach to know about first. API Gateway has a 29 second timeout on requests, and a 10MB invocation payload limit. You can read about API Gateway limits here. Also, Lambda has a 6MB invocation payload limit. More on Lambda limitations here. Bottom line, Lambda is definitely more constraining in this situation.
Overview
For this blog, I'm going to focus on the simplest use case to get this up and running. To make this work, we will be creating the following resources:
- An S3 bucket
- A Lambda execution role
- A Java Lambda function
- A properly configured API Gateway stage
I'm going to use a mix of the AWS Console (for the more complicated stuff) and the AWS CLI (for the easy stuff). You'll want to make sure you have the latest AWS CLI installed and configured.
Once we go through the steps outlined above, we'll test it using cURL command line utility.
Create the S3 Bucket
First, lets create the S3 bucket:
aws s3api create-bucket --acl private --bucket [bucket-name] --region [us-east-1]
Replace [bucket-name] with the name you want to use for your bucket, and you can replace [us-east-1] with your desired region. I use brackets to highlight the variables you will want to swap throughout the blog; you won't use them when you execute the function (e.g. --bucket myphotobucket). I'm also a fan of the new controls for blocking public access to buckets and objects, which you can apply with the CLI also.
Create the Execution Role
Next, let's create the execution role. To do that, we will need to permit lambda to assume the role we are creating using a trust policy. Let's create a trustpolicy.json file:
{
  "Version": "2012-10-17",
  "Statement": [
    {
      "Effect": "Allow",
      "Principal": {
        "Service": "lambda.amazonaws.com"
      },
      "Action": "sts:AssumeRole"
    }
  ]
}
Next, we'll create our lambda role, and attach the trust relationship:
aws iam create-role --role-name [fileupload-lambda-role] --assume-role-policy-document file://./trustpolicy.json
Note that the file:// in front of the file path is required. I used a relative path, but you can use a fully qualified path as well. In a terminal on a unix/linux system, this looks like file:///path/to/file/trustpolicy.json or on windows file://C:\path\to\file\trustpolicy.json. Finally, we'll want to give the Lambda permission to execute, and put objects in S3, and write to CloudWatch Logs. We'll use two CLI statements:
aws iam attach-role-policy --policy-arn arn:aws:iam::aws:policy/service-role/AWSLambdaBasicExecutionRole --role-name [fileupload-lambda-role]

aws iam attach-role-policy --policy-arn arn:aws:iam::aws:policy/AWSLambdaExecute --role-name [fileupload-lambda-role]
Now our lambda role has all the permissions it needs to upload files. Note that the AWSLambdaExecute role gives permission to all CloudWatch Logs and S3 Buckets; you should lock that down further once you see how this works.
Create the Java Lambda Function
I have uploaded this code as a maven project to our public Github account. Feel free to look there for all the maven imports that I am using, and/or use the code as a starter project. For this example, we're going to upload an image.
When the image is sent through API Gateway (once it has been configured properly; more on this later), it will arrive as a Base64 encoded string. After it is decoded, we can process the multipart/form-data directly. To do that, we need to know the boundary. A boundary is part of the W3C Content-Type specification, and is used to split up the data provided via a multipart/form-data request. Once we have the boundary, we can process the stream using an Apache Commons FileUpload MultipartStream. Once we can process the file from the MultipartStream, we can put it into S3.
The Java Lambda function code is provided below with inline comments. Note that in this example, the function is simplified to handle a single file sent via a multipart/form-data request. As a Lambda Proxy, it could receive other types of requests from API Gateway. Read more about Lambda proxies, and keep in mind that you may want/need to add more logic to handle other types of requests, actions, etc before going into production.
Make sure you read the inline comments in the above code snippet. There are a couple variables you'll need to update (e.g. region and bucket name). If you clone the repo from github, you can package it using the mvn clean package command once you update the variables. The POM includes the necessary specification to create a fat jar, which is required for lambda. The resulting fat jar will be created in the ./target folder of the project.
To create a lambda function using the jar produced above, and to assign the execution role we created earlier you can use the following create-function CLI command:
aws lambda create-function --function-name [fileupload] --runtime java8 --role arn:aws:iam::[account-number]:role/[fileupload-lambda-role] --handler [fileupload.FileUploadFunctionHandler::handleRequest] --zip-file fileb://./target/fileupload-0.0.1-SNAPSHOT.jar --region [us-east-1] --timeout 60 --memory-size 320
I found that a memory size of 128 MB is too small, as uploading a 66kb file took 147 MB of memory, according to the lambda execution report. So keep an eye out for memory consumption in the Lambda console. You may want to replace the other variables I have placed in brackets. If you don't make any changes to the java package, you can just update the [account-number] in the role, and you should be good to go (after removing the other brackets of course).
If you need to update the code, and push it to an existing Lambda function, you can do so via the CLI using update-function-code:
aws lambda update-function-code --function-name [fileupload] --zip-file fileb://./target/fileupload-0.0.1-SNAPSHOT.jar --region [us-east-1]
Create the API Gateway Stage
The most important thing to know about setting up API Gateway is that we must configure it as a passthrough for binary data. I must credit Anton Myshenin's JavaScript lambda-multipart-parser documentation for being the first mention of this that I found.
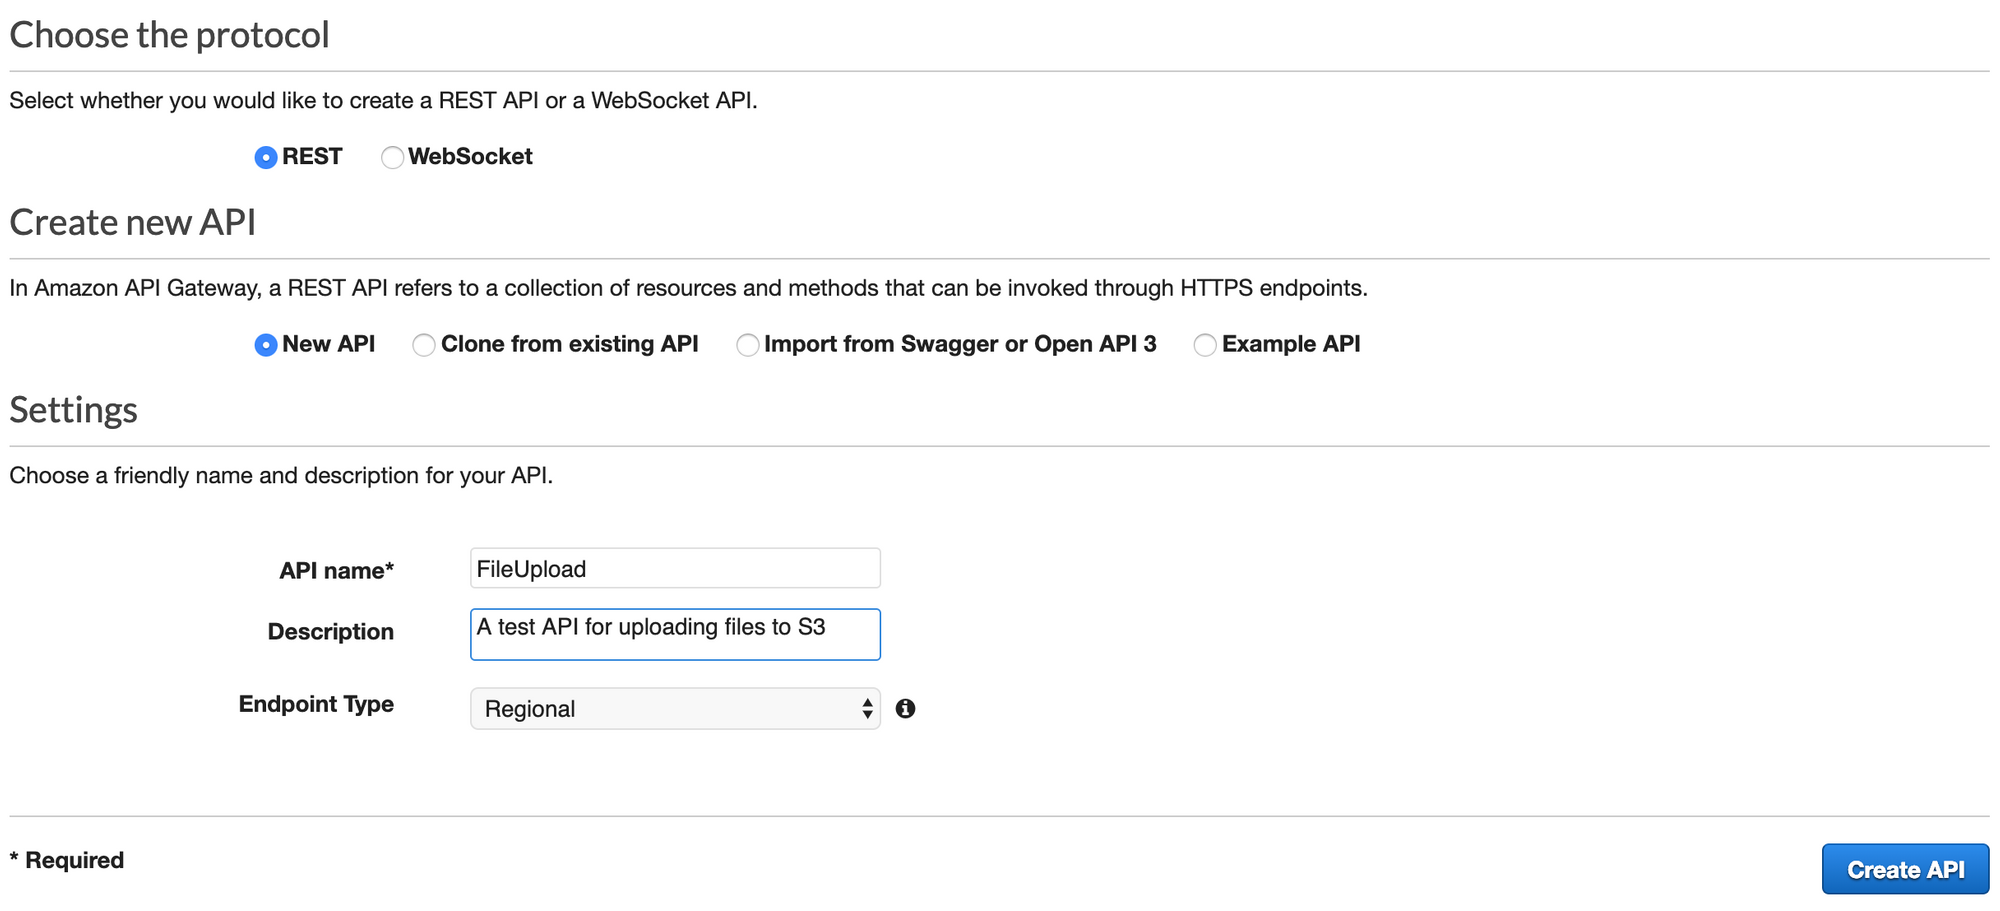
First, we'll create an API in API Gateway. I'm going to do the steps for this phase in the AWS Console. As you can see below, I chose to use a Regional, REST API. Regional APIs do not have CloudFront distributions in front of them, which for our use case is a good thing.
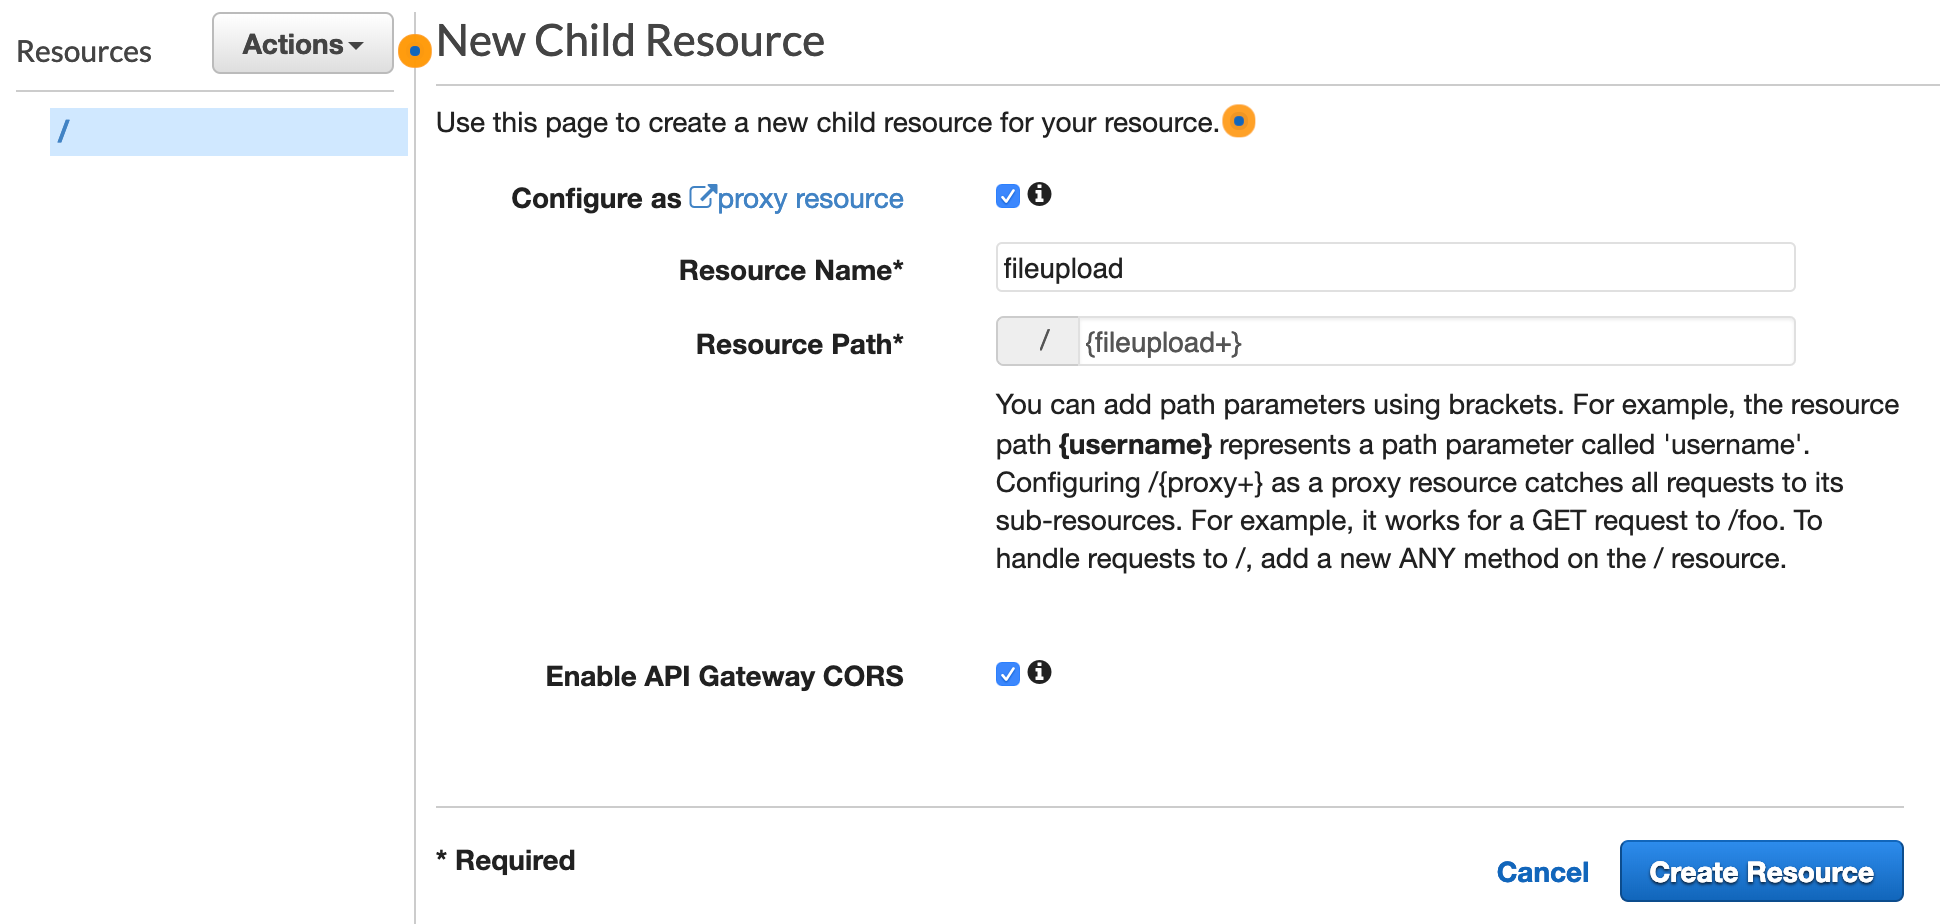
After creating my API, I need to create a resource and method. Go to 'Resources' in your newly created API, and choose 'Create Resource' from the Actions menu. As shown in the image below, we want to set up this Resource as a 'proxy resource'. As such, we need to give it a unique path. The resource path must fit the following naming convention: {name+}. I chose to name this example {fileupload+}. We also want to enable CORS. Note that you can only have one Lambda Proxy per resource; if you ever try to create a second proxy under the same resource path, you'll get an error.
Once you click 'Create Resource', you will notice that the fileupload resource and 'ANY' method are created. As a proxy, any/all method requests are passed to the lambda function. Now we just need to connect our 'fileupload' lambda to this API Gateway ANY method. To do that, select the 'ANY' method as shown below.
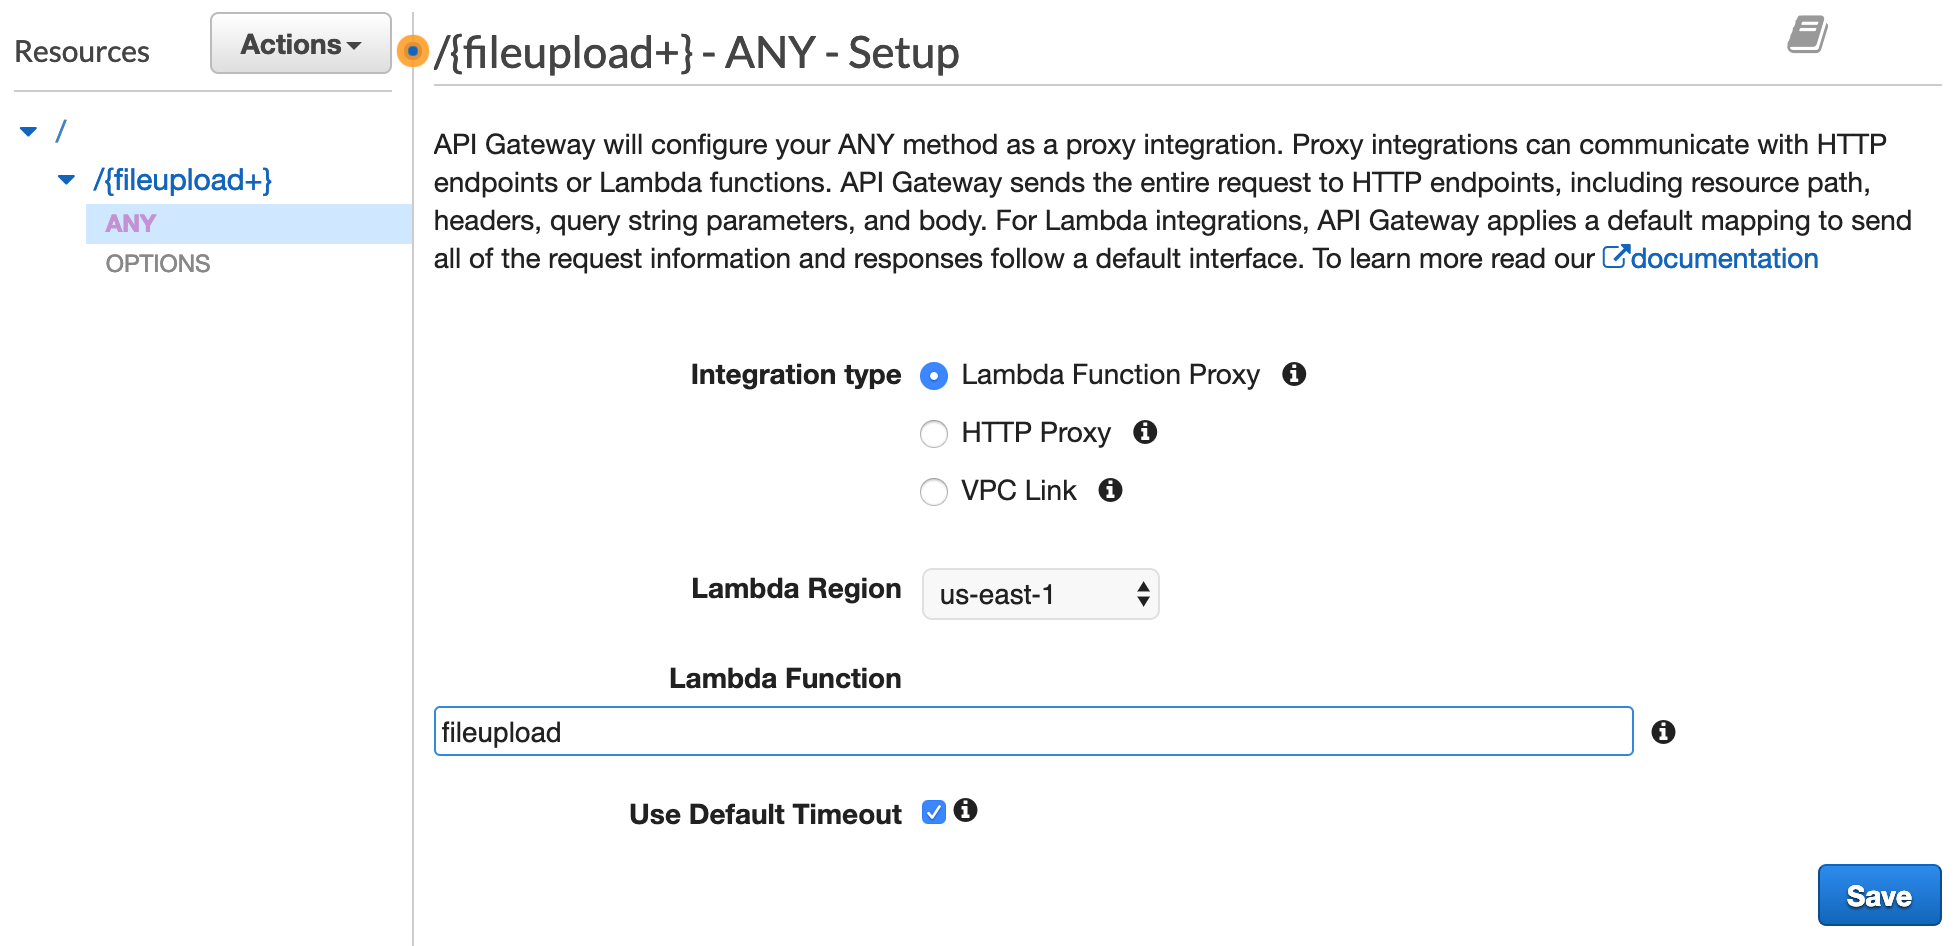
The 'Integration type' will already be set to 'Lambda Function Proxy'. Choose your region, and start typing the name you gave the Lambda Function -e.g. fileupload. Then click save.
When prompted, give API Gateway permission to invoke your Lambda function: arn:aws:lambda:us-east-1:[account-number]:function:fileupload.
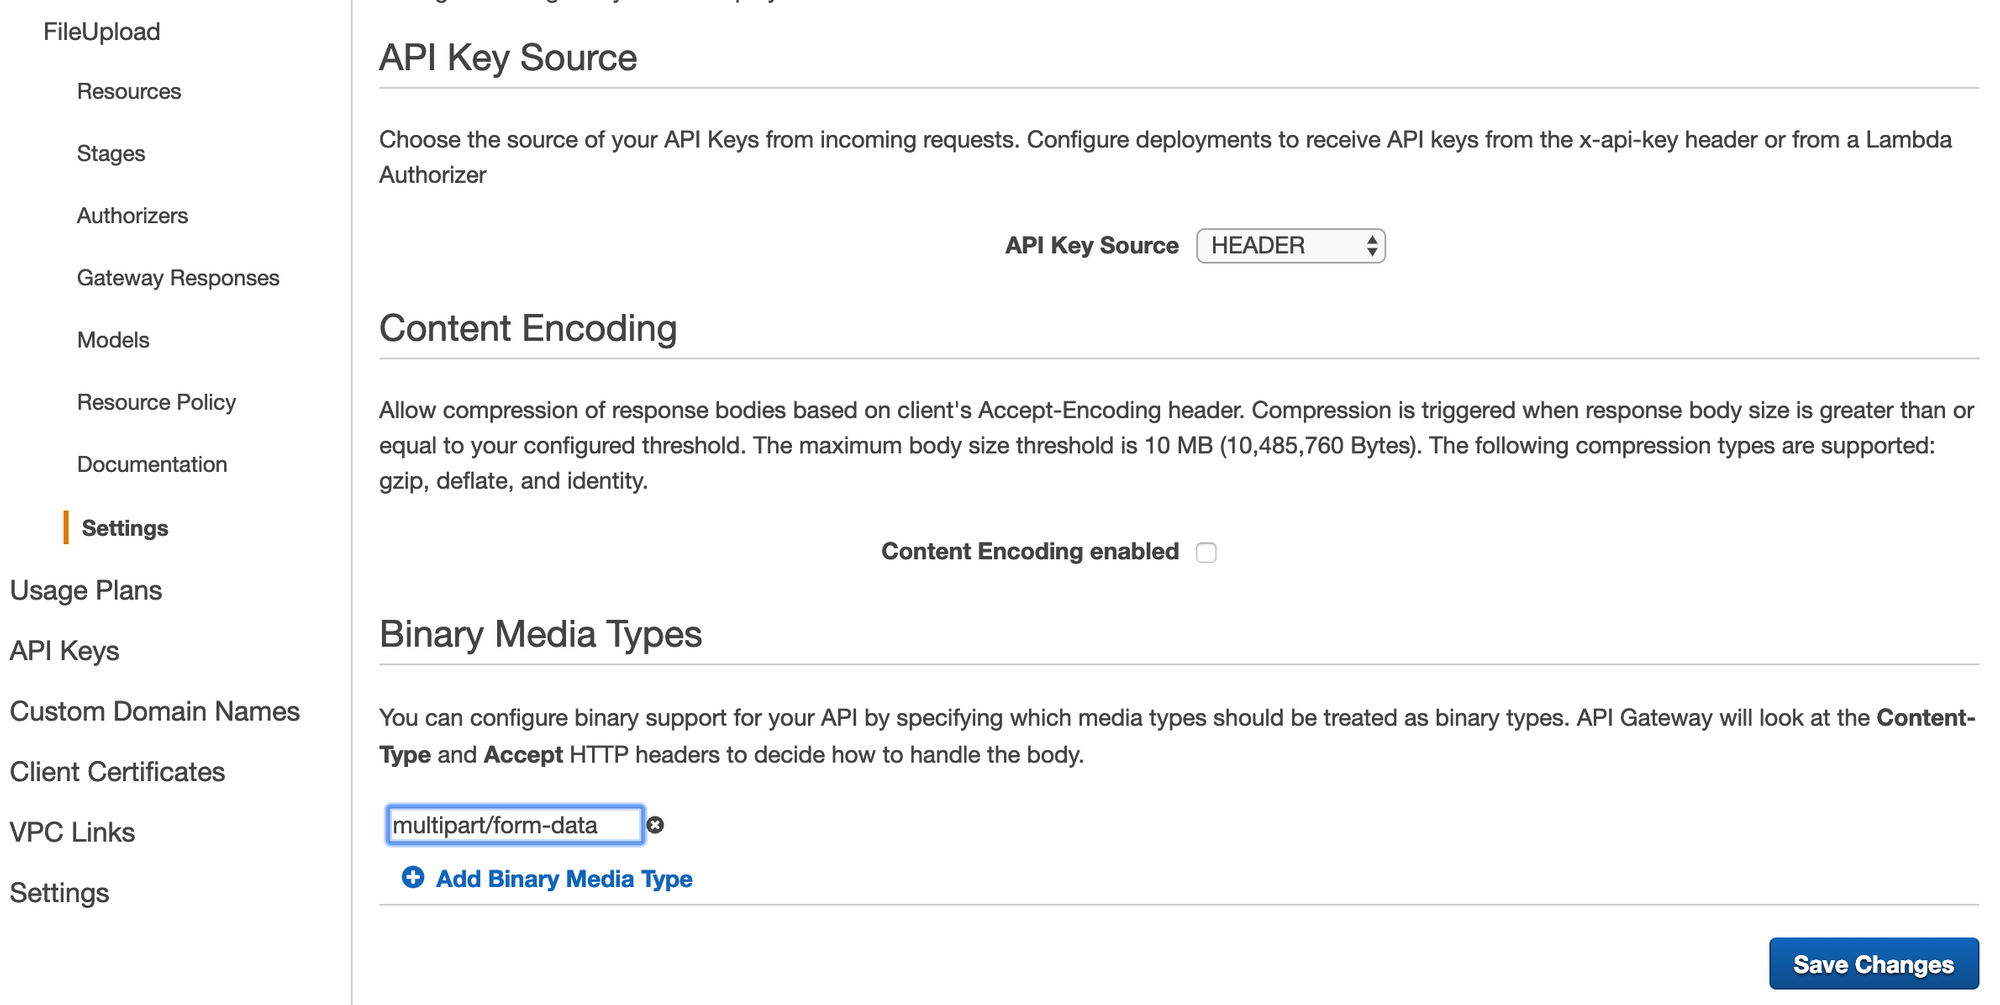
Next, we need to tell API Gateway that it should handle multipart/form-data as a binary data type. To do that, go to Settings under your API as shown below. Look under Binary Media Types, and add 'multipart/form-data' to the list. Then save this change.
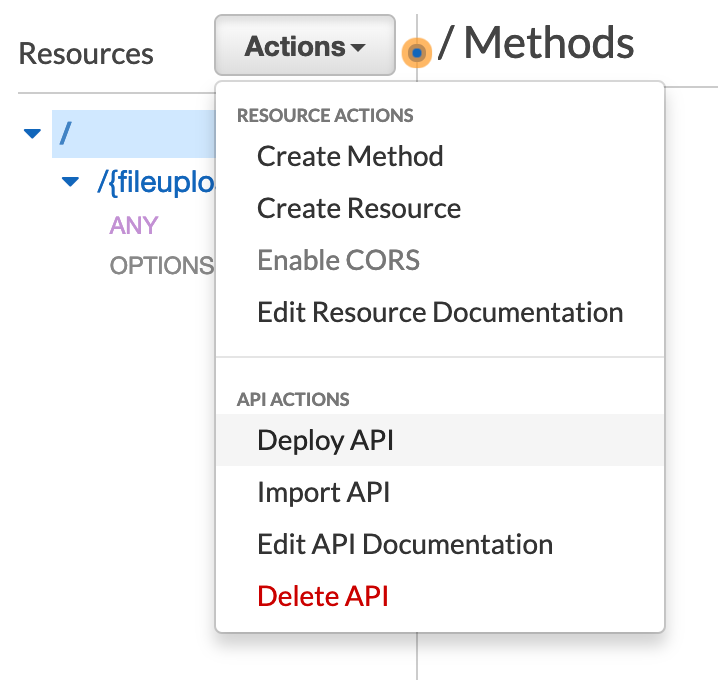
Now we need to deploy this API to a Stage. Go back up to the 'Resources', and click 'Deploy API' under the Actions menu.
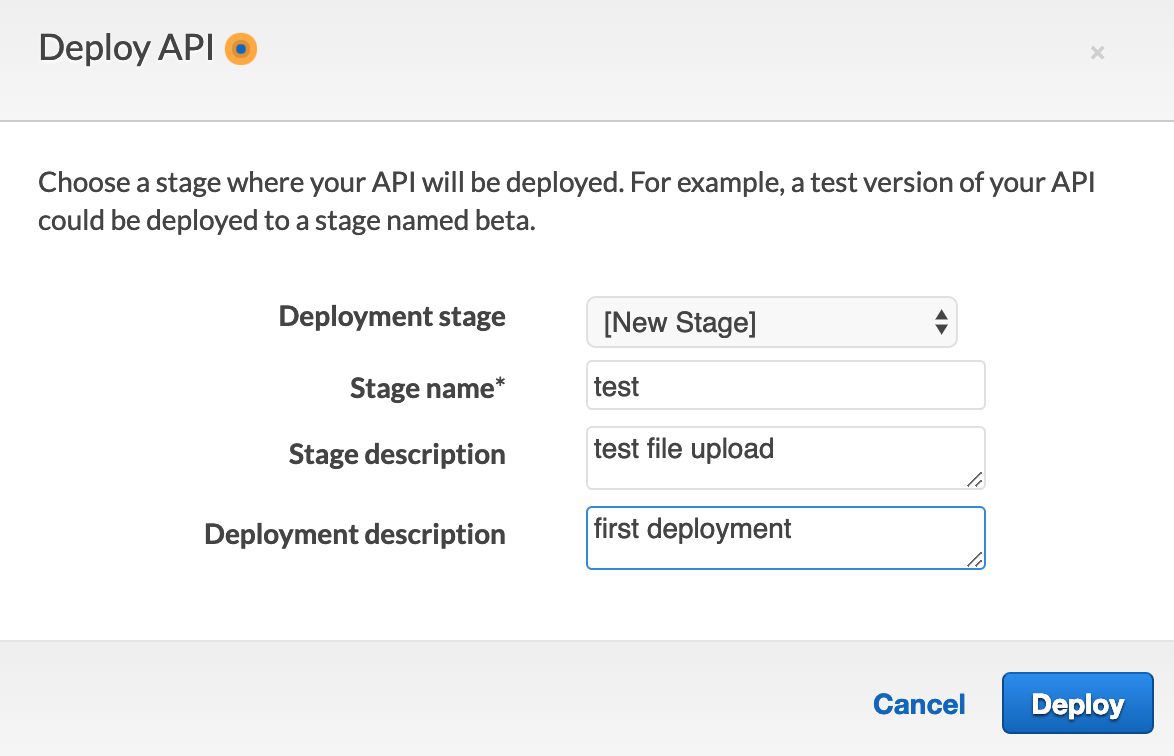
We'll need to create our first Stage in which to deploy. On the modal, simply give yours a name. I called mine 'test' as show below.
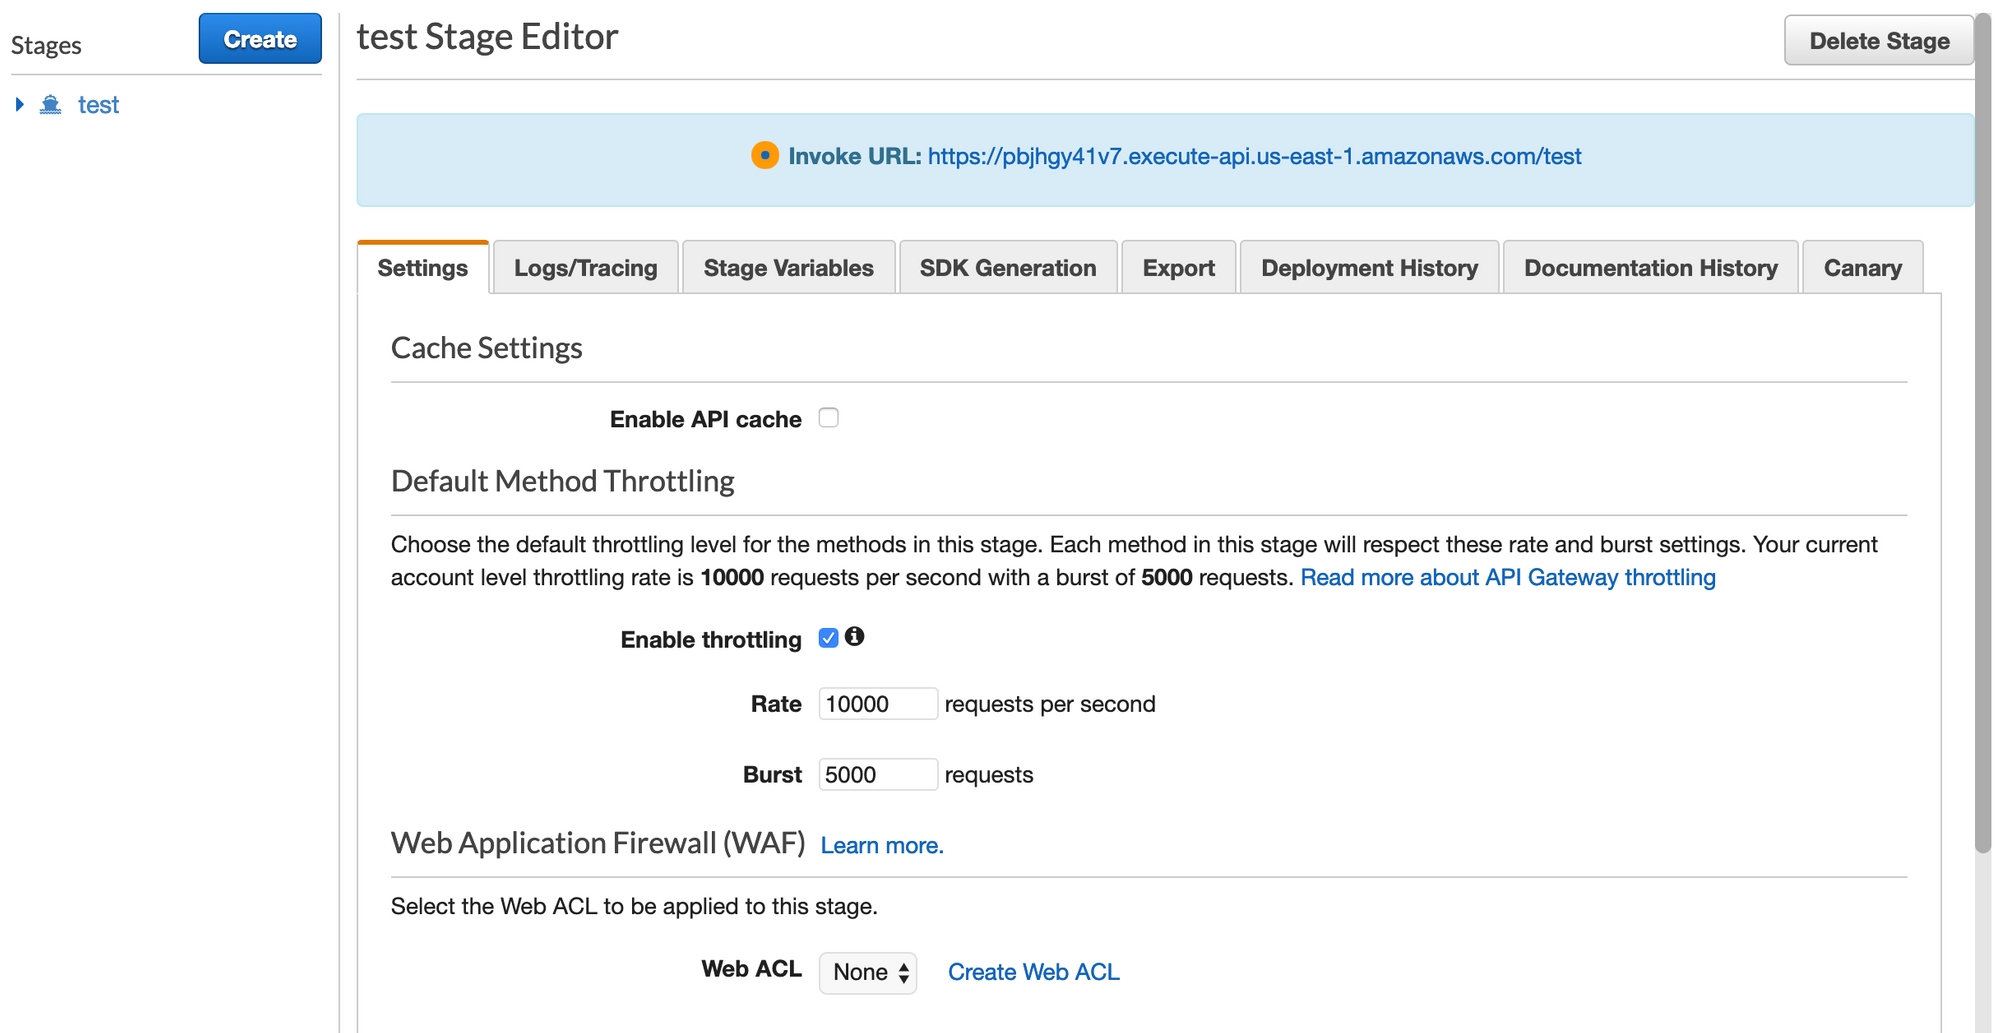
After deploying the stage, we'll look for our 'Invoke Url'. This can be found by clicking our 'test' stage after it is created, as shown in the blue banner near the top of the screenshot below.
Testing
To test this, we will use a curl statement. Notice the -F option. It will automatically tell curl to add the appropriate content-type with a boundary.
curl -v -X POST \
"https://[gateway-api-id].execute-api.[us-east-1].amazonaws.com/test/fileupload" \
-F "data=@[picture.jpg]"
You will want to replace the [gateway-api-id] with your API ID from the API Gateway Stage, and possibly switch out the [us-east-1] region depending on where you're deploying to. Lastly, you will want to choose a file to upload, replacing [picture.jpg].
If all goes well, you should see the following response:
{"Status":"File stored in S3"}
You should then go to the S3 bucket via the AWS console, verify that the file exists, and open/download it to verify that it is valid.
Conclusion
Hopefully this post has been helpful. Please let me know if there is anything I can help clarify. One alternative to using API Gateway and Lambda for file upload to S3 is to use a presigned S3 URL. You could build a Java Lambda function that handles an initial request to generate a presigned URL, and returns that URL to the client. Then the client can use that URL to upload the file. Two quick internet searches revealed examples for Java and Javascript.